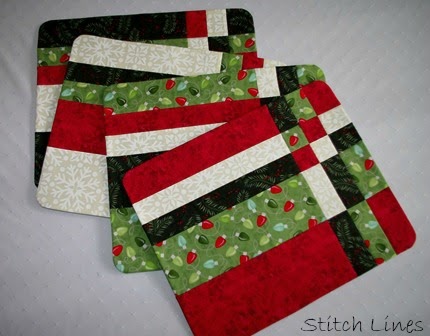
A few days ago I showed you a set of four placemat tops
here. The pattern was quick, easy and fun! What more could you want? The pattern directions for finishing off the placemats suggested either binding the mats (
who wants to spend time doing
binding for placemats!!? Not me...) or pillowcase style where you leave an opening along one edge and turn through that opening. Yeah.... well, you know how hard it is to then close that opening and get it totally straight and smooth so it's not noticeable. I prefer to use another method and thought I'd share it with you here. I find it gives a better looking product- all edges are even, straight and smooth. It's as easy as a seam across the backing of your placemats, leaving an opening in that seam and turning the mat through it, then hand-stitching the opening closed. Who really cares if there is a seam on the back- seriously, who would even notice??
First of all I should tell you that I have trimmed down these placemats slightly to "fit" the request from Meals on Wheels - they like the mats to be about 12" by 16". The Take Four pattern will give you placemats larger than that, but the pattern does not give an exact size, as what you get will vary depending on the size of your four fat quarters. (Yes they
should all be pretty much the same size, but they're not... just sayin')

This method does requires purchasing a few more inches of fabric for the backing IF you are laying the mats lengthwise on your backing fabric. (If laying crosswise on your fabric, no worries.) I like to make this backing seam a 1/2" seam, so I cut the backing at least 1.5" longer and about 1" wider than the mat. I chose a dark green from the Moda Marble Swirls line.
Then cut it in half - crosswise, not lengthwise. Stitch a
1/2" wide seam, beginning with normal stitch length for several inches, then backstitch and switch to a basting stitch. Don't even cut your thread, just continue stitching/basting across to within a few inches of the other edge, then switch back to normal stitch length, backstitch, and finish seam at normal stitch length.

I then press this seam
open - press it well so you get a good crease. Then the choice is yours whether to press to one side or leave it pressed open. The well defined crease will come in handy when hand-stitching the opening closed.

Now lay your placemat top on top of backing, right sides together, smooth out with your hands, and trim the backing to fit your placemat exactly. Leave these two right sides together, and place on top of your batting with wrong side of backing up. Your "stack" should be in this order: batting on bottom, placemat right side up and backing right side down. You can trim the batting to fit now, or trim after stitching. Pin around the edge so that nothing will shift.
Let me tell you about this new product I tried for the batting. It is called
Stiff Stuff and it's made by
Sew Lazy - Lazy Girls Designs. I. LOVE. IT.
(If you're a local reader you can get it at our new local quilt shop- The Christmas Crab Quiltery.) The label describes it as a "firm flexible sew-in non woven 100% polyester "interfacing" - it is PERFECT for placemats. It is firm but not stiff and it yields a perfectly flat placemat ( no wine glass wobble! ha). It is not bulky at the edges where it is in the seam either. LOVE IT. It's my new go-to for placemats and runners from now on.
Stitch a 1/4" seam all around the placemat - no need to leave an opening along the edge. I chose to round the corners. I like the look of rounded corners, and it's easier than trying to get four perfect square corners- seems one is always too pointy! pffft! I found a small Tupperware lid in my kitchen to draw the curve at each corner. Once I have sewn all around the mat, I trim the curved corners a bit, to reduce bulk and ensure a smooth corner edge.

Now you are ready to remove the basting stitches along that backing seam. If you backstitched at each end of the regular stitching, it's easy to pick out the basting and stop when you reach the backstitching. Now reach through the opening and turn the mat right side out. Smooth out the mat and take it to your ironing board. Press carefully all around the mat's edge, being careful that the backing fabric does not show on the front. (Again- the Stiff Stuff gave a beautiful edge. No, I don't work for the company. I'm just a new fan! lol) Once your mat is well pressed, you can hand-stitch the opening closed. I use matching thread of course, and small invisible stitches. I slide the needle along inside the fold - that nice creased edge you got from pressing that seam open - then take a small stitch of the fabric below if you pressed the seam to one side. If you left the seam pressed open, you'll be sliding your needle inside both creased folds, going back and forth from one side to the other. The trick is to keep your stitches small so the seam will be fairly strong.

The final step is to quilt your mats. I just did stitch in the ditch with monofilament thread. Some choose to also topstitch around the edge, about 1/4" from edge.
I am so pleased with this set of placemats, I sorta hate to part with them, but they
will be going to Meals on Wheels for the Christmas dinners. Hopefully they will brighten the day for four clients. I'll be making another set for myself one of these days, and I'll be using this method for turning them. Easy Peasy. Merry Christmas!
If you have found this tutorial as a result of a search for "placemat finishing," please leave me a comment and let me know how you like my technique. Better still, send me a photo of your finished placemats!
Peace,
Linda
"Some people choose not to donate their services because they believe that it somehow devalues them by 'giving them away.' In truth, there is nothing that demonstrates the value of your skills more than putting them to good use for a cause you believe in." ~ Scott Allen
 I promised you before Christmas to show you my "holiday gift sewing" once the gifts were received and opened. Well, that was more than a week ago now, wasn't it? Just call me slacker! The issue has been the photos. I had three projects - the first was a set of Christmas placemats for Laura- yes, my current fav pattern - the "Take Four" mats. They were done for a while before I had the package ready to send. But can you believe we seemed to be in a "grey" period weather-wise, and there was not one bright day to get a good photo outdoors with natural light. The ones I took inside are yellowish- very poor for giving you a good idea of the true color. You might have caught a glimpse of the fabrics in this photo of Ollie, my tried and true studio companion and "helper". (I use that term "helper" very lightly!)
 And Laura has not been off work on a bright day either, so still no good photos of the set. She did send me this photo of three of the four mats on their table one night recently just before dinner. So this will have to suffice until she gets a better outdoor photo in natural light.