STITCH LINES...... Ramblings on life as a quilter, stitcher, traveler, photographer, gardener and lover of books, cats and fine chocolate....

Monday, December 31, 2018

Happy New Year!

2018 is almost done.. just a few hours remaining. Christmas flew by, as did the entire year! I haven't done much blogging, or photography either for that matter, in 2018. I hope 2019 will be a more "productive" year.
I hope you enjoyed a peaceful and relaxing Christmas, however you chose to celebrate the season. I have lots to catch you up on, do visit again soon.
Wishing you a happy and healthy new year full of fun times and wonderful memories.

Peace,
Linda

"Year's end is neither an end nor a beginning but a going on, with all the wisdom that experience can instill in us.
Cheers to a new year and another chance for us to get it right."
~ Oprah Winfrey

Friday, November 30, 2018

A Musical Treat


Our Ladies Choir Christmas Concert is coming right up... Sunday afternoon, Dec. 9. I have a few tickets left, but will have them only until Tuesday Dec.4. After that, they are available from Westminster Books on King St. or at the door on concert day. We have been working very hard, some of our music this term is quite challenging. Sally, our director, is singing one piece with us - hearing this piece alone will be worth the price of admission. Trust me, you won't be disappointed! I'd love to see you there...


Peace,
Linda

"The best way to spread Christmas cheer, is singing loud for all to hear!"
~Buddy the Elf

Sunday, October 7, 2018

Introducing......

11 hours old...
...Our new granddaughter finally made her appearance in the wee hours of Monday morning, October 1. She was only a few days "late" for her due date of Sept. 27, but Mummy's OB was so sure she was going to arrive a few weeks early, the last few weeks of waiting seemed to go on forever... But, here she is. She was SO worth the wait!

Can you believe they didn't have any PINK hats left at the hospital??!!


Layelah Rose arrived at 2:40 a.m., very shortly after Mummy arrived at the hospital, and weighed in at a dainty 7 lbs. 1 oz. Her birth was quick and easy, so Mummy is doing well, recovery-wise. She looks exactly like her brother Noah did at birth- except for her darker hair, they could be twins. And speaking of hair, yes, she has lots! I think she'll need a hair appointment soon! lol


Big brother Noah is getting used to the idea of having a little sister. He wasn't terribly interested in her at first - was more interested in her swing! Typical boy! But after a few days, he's doing much better. Mummy and Daddy are doing a great job at involving him and making him feel important by giving him little jobs to do to help out. Today he was very proud to fasten her car seat buckles, and sit beside her in the van.  :)


 Yes, she's a little cutiepie! I think she's a  keeper! 

3.5 days old here and already smiling at Mummy!


Happy Thanksgiving, everyone! You know what WE are giving Thanks for today...


Peace and Love,
Grammy Linda

Such a BIG MIRACLE in such a little girl...

Sunday, September 23, 2018

Needle Organizer

Today I'm sharing a recent small project with you - an organizer for your sewing machine needles. When I teach machine quilting classes, I always take a variety of needle types to show, and until recently I also took my bulk box of quilting needles, as many quilters don't know you can save a considerable amount by buying needles in bulk (100 in a box). After one particular class, my supplies were all loaded on a cart to transport them up from the church basement classroom and out of the building. The cart tipped a little when I pushed it over some uneven ground at the building entrance and I didn't realize all my little needle packages, held together with an elastic, slid out of my totebag and fell off.  It wasn't until the next Friday when I was packing up again to head out of town to teach another class, that I realized ALL my needles were missing. Luckily I remembered the cart tipping and thought they must have fallen off; I made a frantic call back to the church office and they were located. I said a silent thank-you to the kind person who found them and turned them in! (Bet she was a quilter!)


Anywaaaay... after that I decided I needed something larger to accommodate my needles so if they tried to escape again I would notice... wink. When I found the directions for this case on QUILTsocial.com I knew it would be the answer. You can find the first set of directions by clicking here. It is a five part article, with the link to the next  day's directions at the end of each post.


Mine measures 8.25" x 10.25" when closed and 10.25" x 16.5" when opened. Here it is opened up to reveal the vinyl pockets, top edges bound with (purchased) double fold bias binding. The stitching which divides the pockets is done with a 2.5mm. twin needle; of course it could be done with  single needle as well, but this was a project designed to get you more familiar with twin needle stitching.


Here's a closer look....

I made a few small changes - I made mine smaller (fewer pockets) and used just one size of twin needle rather than the three sizes suggested. I also rounded the corners of the case and used a continuous binding which I thought looked neater; of course the binding had to be cut on the bias to go smoothly around those curved corners but worth the effort I think.


I used two buttons for the closure instead of just one. I decided to use two fancy buttons I had purchased years ago for crazy quilting.. I have SO many lovely buttons that have gone unused, so why not use two particularly pretty ones for this case .. what am I saving them for??!!


The organizer is made in two sections- the outside is layered with fusible fleece and quilted; I followed the suggestions of a twin needle crosshatch in the lower section but did single needle organic lines in the upper section.  I LOVE the look of twin needle crosshatching, I do it often. This one is quite narrow- the lines are 1/2" apart and done with a Sulky rayon thread. The inside layer is fabric backed with nonwoven interfacing and then the vinyl strips are added to create the pockets. Then of course the two sections are placed wrong sides together and the edges are bound.

The one suggestion I would make if you decide to make one of these is to do with stitching on the vinyl. If you have never stitched on vinyl before I'd suggest you buy a very small amount (or borrow a little piece from a sewing friend) and see how your machine handles it. The article suggests that you should have a non-stick/teflon foot. Good advice, but likely not a foot many quilters have, and they can be pricey and perhaps hard to find. So try it without and see how your machine will handle the vinyl. I had no trouble, hopefully you will be just as lucky. EDIT: Read the comments below from Holly and Karen for suggestions on stitching on vinyl.
It's a fun little project. If you make one, send me a photo!   :)
I like QUILTsocial.com and visit often - there are many interesting projects presented and lots of good info and advice, tips and techniques. You may also have noticed I use Schmetz needles almost exclusively - top quality German made, they are THE BEST hands down. For a topstitch needle I prefer Superior Threads titanium coated topstitch needles, also top quality! The needle is one of the most important parts of your machine- buy top quality and change them often!

Piece!
Linda

Sewing machine - the ultimate power tool!

Sunday, September 16, 2018

Catching Up and Mr. Noah


Well it's high time for a catch-up! (Okay, it's long past time!)  The days and weeks have flown by... I don't know where the summer went. How can it already be mid-September. Sigh.
I'm so far behind I don't know where to start. Let's just say it was an extremely busy summer. Wish I could tell you I have travelled to exotic destinations, but that would be a lie. It was just super busy with lots of hot dry weather so I spent a lot of time watering and trying to keep my vegetable gardens and all flowerbeds alive. Our water bill reflects it...  :(   There were some day trips, lots of visits with Mr. Noah both here and at his home, a summer wedding, a 5 day trip to Maine, a reunion of university friends, company for several weeks... well you get the picture. Busy times! There was also a kidney stone and a bout with the flu, but otherwise a great summer. Most of my pickling is done... 2 batches of Lady Ashburnhams, a big batch of 11 day crock pickles, peach jam, salsa, and ratatouille are all done. Many litres of stewed tomatoes from the garden are in the freezer. My apple jelly is underway, apples cooked and the juice in the freezer to be boiled and bottled another day. Pickled beets are the only thing remaining; my beets are not very big, guess it'll be pickled baby beets this year!
There hasn't been a lot of sewing or quilting done this summer. I did do a few small projects I cannot reveal yet, plus helped a friend make a totebag and helped Laura make a small quilt.

So how about an update on Mr. Noah, which I promised a while back... Noah is now two!!  (Time is passing much too quickly!!) He is a bundle of energy, picking up new words and skills daily. He is a delightful little guy, and brings much joy into our lives. So without further chat, here are a few of my favourite photos of him, taken over the last 10 months, since you haven't seen any photos since his first birthday! (Indulge me, okay?!)

Photo Credit Jennifer McKelvay

Photo Credit Jennifer McKelvay 


Christmas visit with cousins Ada and Josephine


I think this one is an all time fav...  Yes he's definitely all boy, right down to the ball cap on backwards!


Noah has some big news to share with you... he's going to be a big brother!! Soon!! And this PINK icecream photo revealed to all that it's a GIRL!!!!!!!!!! I couldn't be any more excited.


Of course Noah and I had to celebrate with some icecream too, at the Wharf Village, Magnetic Hill.


          And then there was Noah's second birthday to celebrate..with chocolate cake, of course!


Who could resist this sweet face?


Yes indeed, this sweet boy has stolen my heart. I'm sure you can see why....


Peace,
Linda

"Surely, two of the most satisfying experiences in life must be those of being a grandchild or a grandparent." 
~ Donald A. Norber

Monday, September 3, 2018

NSFAF Classes


How can it already be September??!!! The summer flew by, and before we know it fall will be here. Once again this October I am teaching at the Nova Scotia Fibre Arts Festival in Amherst NS. Classes are filling up; if you wish to register get in touch with me soon so you won't be disappointed.


Paper pieced bed quilt


On Friday October 12 I am teaching Foundation Piecing for Quilters. This class will cover both paper piecing and string piecing. If you have tried paper piecing and think you don't like it or can't do it, or if you find it frustrating or stressful, you need to take this class - I will change your mind. If you can sew on a straight line and count to 10, then you CAN do it! This technique guarantees a perfect block every time and it is the answer for blocks with many seams like Log Cabin or Pineapple, for tiny blocks for miniatures, and for complex blocks with sharp points like Mariner's Compass or New York Beauty.

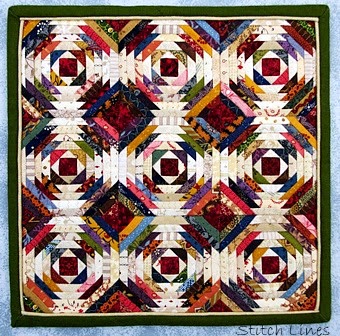
Miniature quilt, 8.75" sq. 447 pieces. Easy with Foundation Piecing!
We'll spend the morning learning HOW to paper-piece by making three small blocks, progressing from easy to more challenging. Then in the afternoon you'll learn how to put blocks together perfectly, how to deal with angled pieces and directional fabrics, how to draw your own paper piecing patterns and number the sections correctly, how to approach more complex paper piecing designs, and more. You will also learn how to string piece, a more "free form" type of foundation piecing. It will be a fun-filled day and you'll pick up many tips and tricks. This is a technique that EVERY quilter should know - come and add it to your skill set. I'll bring a number of foundation pieced quilts to class, from miniature to bed-sized, as well as a number of resources - books, magazines, commercial patterns, etc.  By the end of day, you should feel confident to tackle ANY foundation piecing pattern or design.
This class is now full, but I'll take names on a Waiting List in case of cancellations. 


These are some of the straight line designs you'll learn to do
On Saturday Oct. 13 I'll be teaching Quilting with the Walking Foot. This is currently my most popular class. Most quilters don't use their walking foot to even close to its potential... if you've only used yours for "stitch in the ditch" or attaching a binding, if you find free motion is "just not your thing", or if you find free motion work stressful, then this is the class for you! Join me to learn the many ways you can quilt with your walking foot, whether on modern or traditional projects. Geared to the quilter who already has basic knowledge of machine quilting, this class will further explore the many applications of the walking foot.   I will bring many quilts for illustration purposes, and a number of walking foot quilting books for reference. Join me for a relaxing fun-filled day “walking your way” to new quilting techniques!  
...and these are some curved line designs you'll learn
After a quick review of the walking foot and how it works, machine setup, marking and preparing the quilt, we will move on to explore straight line and linear designs, organic lines, many ways to do grids (cross-hatching), matchstick quilting, twin needle work, radiating designs, quilting curves, circles, spirals and clamshells, and echo quilting, as well as the use of decorative stitches for machine quilting and more. You will learn to use your quilting guide, and several other methods of evenly spacing quilting lines without marking. (Who likes marking anyway?) Students will receive detailed notes, many tips and stitching time in class to create samples.
**Prerequisite – a basic machine quilting class. I will assume you have basic knowledge of threads, needles, battings, how to layer and baste your quilt sandwich.
**Pfaff owners – your machine probably has a “dual feed” also called “IDT.” Although called a different name, this IS your “built-in” walking foot. It functions exactly the same way. So you have nothing extra to purchase - how great is that?! 
There are still several spaces available in this class.

Contact me at lindakhubbard(at)gmail(dot)com for more info on either class and to register. 

Piece! (and Quilt too!)
Linda

"It's the teacher that makes the difference, not the classroom." 
~ Michael Morpurgo


Sunday, July 1, 2018

Happy Canada Day!


Happy Canada Day! July 1 has rolled around again and I am more proud than ever to be Canadian. I profess my love for Canada each year, but this year, I am feeling even more thankful to live where I do. With what's going on south of our border and the unrest in other areas of the world, I am so happy and proud to be here in my beautiful little corner of paradise in this great country. Canada may not be perfect, but I sure wouldn't want to live anywhere else. Every Canadian should be celebrating today with great pride our country and for what it stands.

I am happy to share with you today a small "finish". This little "Canadian Pride" quilt measures about 16" x 21". The pattern is called "Proud to be..." and is by Black Eyed Susan Designs. It is made of 12 Log Cabin blocks (still my favourite block!) and machine quilted, the centre portion with 1/2" cross hatch with 50 wt. Aurifil and the red blocks with a diagonal straight line in each log with a 50 wt. red thread. The maple leaf is machine appliquéd (after the crosshatching was done) and finished with buttonhole stitch with a 12 wt. thread.
The blocks are 5.25" finished, with 3/4" logs. How do you make Log Cabin blocks? Do you have trouble keeping them from being wonky? There are a number of methods, some perhaps more successful than others. One thing that does help is cutting the strips on the lengthwise grain - this helps them be more stable and less stretchy. When I have a small number of LC blocks to do, as in this project, I foundation piece them, that way they are perfectly straight and square.


The backing fabric is one of the Discover Canada fabrics by Robert Kaufman, featuring names of many Canadian cities, the perfect choice I thought!
The above two photos are a bit dark, the reds are actually bright rich vivid reds...


Peace and Love,
Linda, proud Canadian!


"Canada is not a melting-pot. Canada is an association of peoples who have, and cherish, great differences but who work together because they can respect themselves and each other."
~ Vincent Massey

Tuesday, May 22, 2018

Gemini in Purple


It's time to share a finished quilt project with you. I wouldn't want you to think I've been lazy, in my absence! (Just the contrary, I've been busy and have lots of projects and book reviews lined up for you!)


This quilt was a Christmas gift for Mark and Maggie.


Their living room colour scheme is neutral - greys and black, and Maggie's favourite colour is purple. So when I found this Hoffman Bali Pop called Urbana (BP #612) I knew it was perfect! I added about 10 more fabrics to get the required number of strips. The purples ranged from true rich royal purples to burgundy and pinky-purples to more subdued blue-purples. The greys were lovely and there were a few very dark teal greens as well. I added a few more greys and some blacks.

The pattern by Blue Underground Studios, Inc. is called Gemini. Not sure that the pattern is still available (I don't see it on their site) but they have many more that are equally as nice! I have made it before and knew it would be quick and easy. I thought its modern look would suit their 30th floor Toronto condo. I was very pleased with how it turned out, in fact I like it much better than the one I made myself from the same pattern. Go figure...


It was quilted by Gwenda Quilts with a grey thread, in a pattern called Wildmouse. I love the circular quilting design, it suited perfectly! Thanks Gwenda! I think you can see the quilting a bit  in these closeups...


Sometimes when I buy a precut such as a Bali Pop, there are some fabrics in the collection that I don't care for. When I first started quilting, I had to like every fabric, but I've learned over the years, that when they're all together in a  project, the ones you dislike don't stand out. The value is more important than the colour or the print. There were a few in this collection that I would not have chosen, but I did leave them in. I thought most of them were gorgeous! Of course, what's not to like about Bali batiks!! They're kind of like chocolates- not many I don't like!  :)


I found a perfect grey print for the backing, and pieced a strip of leftover bits to add some interest...
It measures 54" x 72".  

Oh yes.. they loved the quilt! 

I am linking to Linky Tuesday. Stop by there and see many more quilting projects.


Up next... Mr. Noah!


Piece!
Linda

"All the other colors are just colors. But purple seems to have a soul - when you look at it, it's looking back at you."  ~ Uniek Swain

Sunday, May 20, 2018

Wet morning in the garden...


We need rain! Hard to believe after the recent flooding, but most of the province is tinder dry. We did get a little rain last night and this morning, but not near enough.. A quick walk around the garden revealed many wet tulips, some still upright, and some weighed down with droplets.


Now that spring is finally here (it was a loooong time coming!) it seems to be moving ahead at full speed. The crocus, scilla, chionodoxa and daffodils are finished blooming, tulips are now at their peak, and I noticed today it won't be long before my beloved apple trees are in bloom as they are already budding. When visiting a friend's garden this evening, I noticed her large flowering crab is just a day or two from being in full bloom. I could already smell the blossom's sweet scent.


Ahhh, glorious spring! There will be many more photos from the garden to come...


Peace,
Linda

"The dry seasons in life do not last. The spring rains will come again." 
 ~ Sara Ban Breathnach

Thursday, May 17, 2018

Spring Concert coming up!

Our Ladies Choir Spring Concert is coming up! "Show time" is 7:30 p.m. next Tuesday, May 22. This is the culmination of our tenth year, and will be our twentieth concert! If you are a local reader, tickets are available at Westminster Books on King Street and there will be tickets at the door as well. We have been working very hard to prepare a varied program. It will have a special focus this time, with some selections from the WWII era and a nod to our veterans. A portion of the concert proceeds will be donated to our local Veterans Health Unit to purchase a large flat screen tv so they can have a regular movie night.
Singing is good for the soul, not to mention your health! It has been proven to lower blood pressure and stress levels, it strengthens the immune system, is a natural anti-depressant, improves mental alertness and helps with sleep. All good things in my book! Over and above all that are the wonderful friends I have made through this group. I am a low alto, and we call our row the A team- Anita, Linda, Brenda,  Linda and Sandra. How cool is that! I've been with this choir from its inception and  it is my pleasure and an honour to sing with all these fabulous ladies. So, if you're local and you're not doing anything next Tuesday evening, why not come out and give us a listen? I promise you won't be disappointed...

Peace,
Linda

"The first breath a choir, orchestra or band takes together, a breath filled with focus, intention and emotion, a breath unified for no other reason than to make something beautiful together... that is the reason we do what we do."  ~ Eric Whitacre

Wednesday, May 16, 2018

I'm Back...

I'm back! My rather lengthy absence was not planned and it has lasted too long. If you are a blogger
who has ever taken a break, you know that the longer you are "away" the harder it is to get back. But I am determined to get back to regular posting. I certainly have lots to share with you and now that spring seems to finally be here, I'll be getting out with my camera much more than I have through the winter.
As I said my break was unplanned. Sometimes life just gets busy, and throws a little more at you than you would like. Several close friends have been facing very serious health challenges, and too many friends have lost siblings and parents in the last six months. My sister-in-law lost both her parents in the last little while; they lived directly behind us and have been our neighbours for 27 years. It seems odd to look out at night and see their place in darkness.
I find that sometimes life's challenges take their toll and sap my energy so something has to "give" and it was my blog. But as I said, I'm determined to be back here much more regularly. Blogging does take a lot of time, not just in the writing, but also the photography, editing photos, etc. My fav site for photo editing (Picmonkey) is no longer free so I must find another to use. I would welcome  any suggestions.
Winter as always seemed much too long, and spring was slow to arrive. My city has just experienced devastating flooding. We are safe, high and dry on a hill, but others have not been so lucky. So many have flooded basements, or flooded permanent homes or summer homes. Some summer cottages have literally floated away! It's been terrible; the cleanup will be a very long process. Life can certainly be challenging at times, can't it? My life continues to be very busy but I do hope/plan to keep up with more regular blogging... Give me some encouragement with a comment now and then, will you?

Peace,
Linda

Life is like a camera... Focus on what's important, Capture the good times, Develop from the negatives, And if things don't work out, Take another shot.
Related Posts Plugin for WordPress, Blogger...